Three triangles in perspective
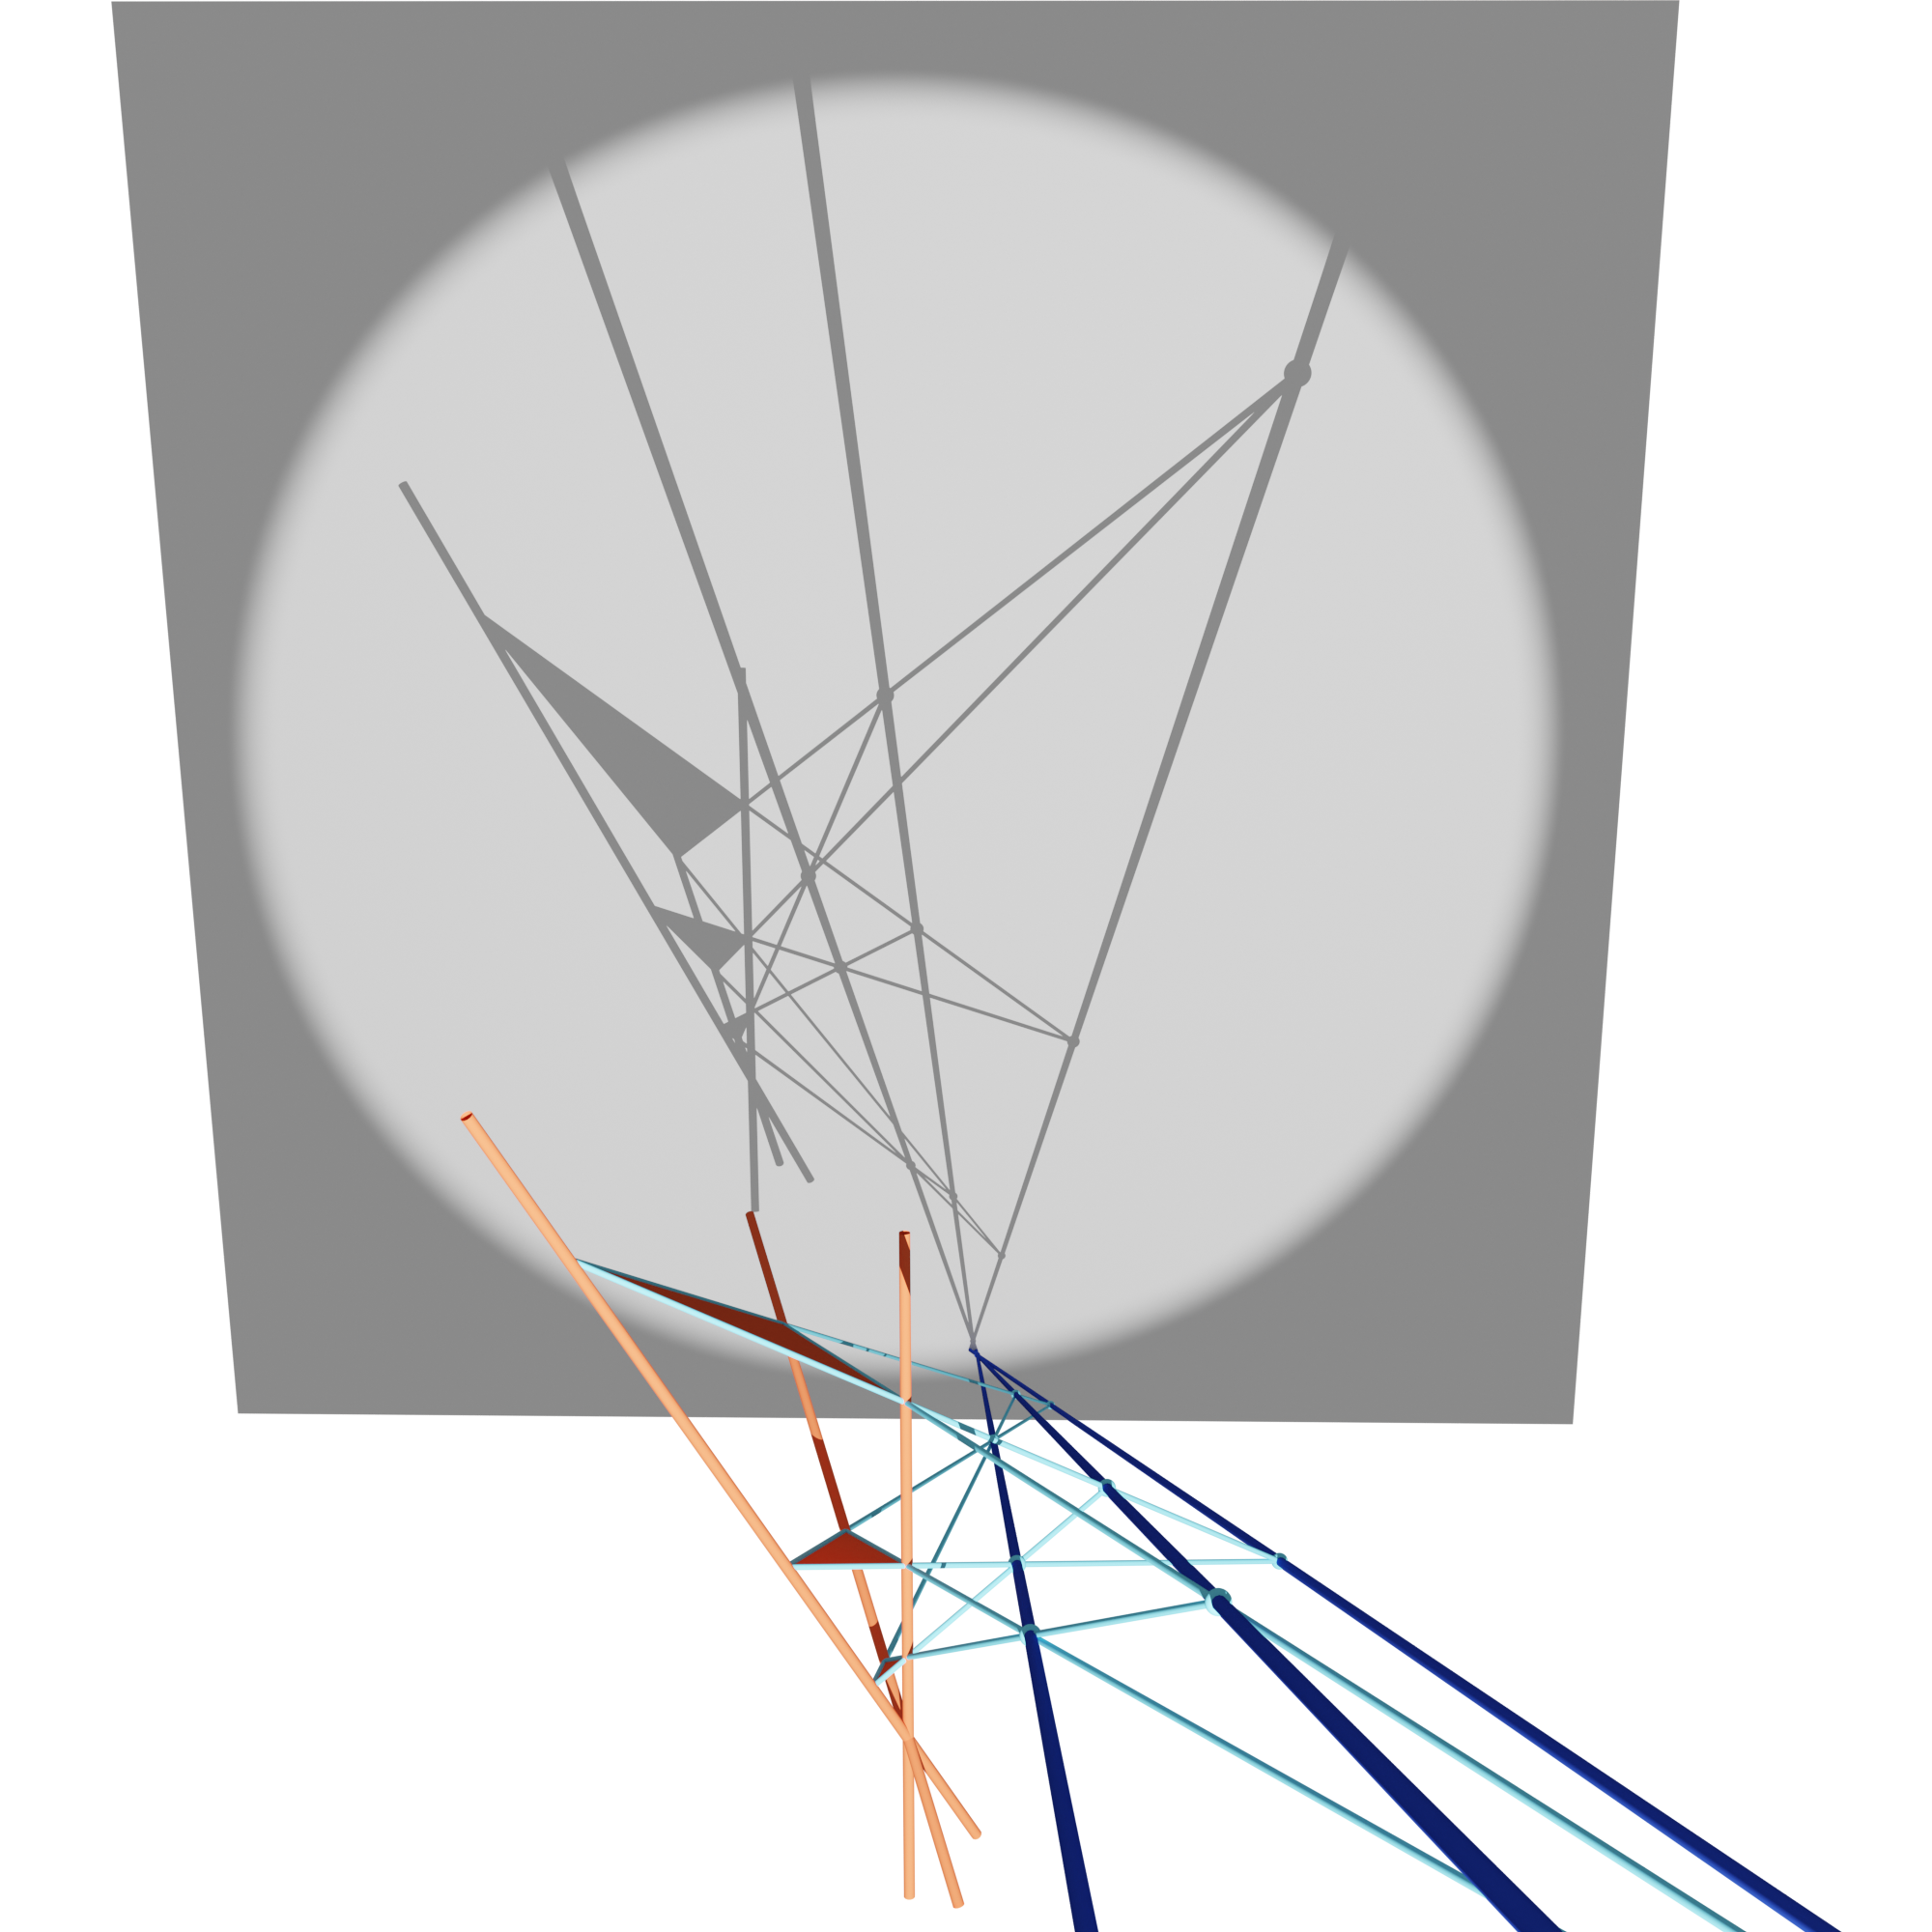
Triangles are said to be in perspective with respect to a point if the three lines through
corresponding points are concurrent (intersect in one point, red triangles).
The resulting point is called the center of perspectivity.
Two triangles are said to be in perspective with respect to a
line if the three intersection points of corresponding lines are collinear.
The resulting line is called the axis of perspectivity (three blue lines,
one for each pair of triangles). Desargues Theorem
states, that two triangles are in perspective with respect to a point if and only if
they are in perspective with respect to a line. For three triangles in perspective, it can
be shown that the three axes of perspectivity are concurrent.
The 3d configuration can be
projected to a 2d plane.
Source code:
three_triangles_in_perspective.py.
Setup
We start off by importing the necessary libraries and clearing the scene.
import bpy
import numpy as np

import ddg
from ddg.geometry import intersection, subspaces
from ddg.visualization import blender

blender.scene.clear()
Next we initialize some data: one point of perspectivity, three directions for the lines of perspectivity (where vertices of the triangles lie on), and for each vertex of a triangle a distance that defines the position of the vertex on the line of perspectivity. Further, for producing a shadow we set initial data that defines a center of projection (the location of the light source), and a projection plane. The data given in this example will produce the picture above.
p = np.array([0, 0, 0])
vs_tmp = np.array([[0, 0, 1], [0, -0.6, 1], [-2, 1, 1]])
vs = [v / np.linalg.norm(v) for v in vs_tmp]
triangle_distances = np.array([[1, 1, 1], [2.1, 3.2, 2.8], [4, 8, 6]])
projection_plane_normal, projection_plane_level = [-1, 1, 0], 80
center_of_projection = [35, -27, 10]
With the given initial data we can create the lines of perspectivity as projective subspaces.
# Lines of perspectivity
p_lines = [
    subspaces.subspace_from_affine_points_and_directions(p, vs[i]) for i in range(3)
]
Geometric Calculations
The three triangles can be constructed in different ways using the distances given in the initial data. Here we show two possible ways where in both cases a resulting triangle will be represented as a list of three points.
# Three triangles in perspective
affine = False

if affine:
    # Implementation via affine coordinates
    triangles = [
        [subspaces.subspace_from_affine_points(p + dists[i] * vs[i]) for i in range(3)]
        for dists in triangle_distances
    ]
else:
    # Implementation via homogeneous coordinates
    triangles = [
        [subspaces.Point([1, dists[i]]).embed(p_lines[i]) for i in range(3)]
        for dists in triangle_distances
    ]
Now we are able to construct the edges as subpspaces, intersect corresponding lines, construct the axes of perspectivity and intersect those.
# Edges of triangles as subspaces
edges = [
    [intersection.join(triangle[i], triangle[(i + 1) % 3]) for i in range(3)]
    for triangle in triangles
]

# Calculate intersection points
edges_intersections = [
    [
        intersection.intersect(line1, line2)
        for line1, line2 in zip(edges[i], edges[(i + 1) % 3])
    ]
    for i in range(3)
]

# Three lines formed by intersection points
lines = [intersection.join(*points) for points in edges_intersections]

# Calculate the second point of intersection
x = intersection.intersect(*lines)
In order to construct the light blue segments as in the picture
we need to initialize those subspaces in a specific way. Each light
blue segment contains four points: two corresponding
to an edge of a triangle and two lying on the axes of perspectivity.
One can determine the outer ones, for example by computing signed distances,
use them to construct a line,
and visualize this line using domain=[[0,1]].
# Prepare for visualization: Create lines/subspaces that join
# intersection points and edges of triangles
def join_outer_points(*points):
    """Takes projective points on a line and computes, in affine
    coordinates, the 'outer' points to join their projective
    counterparts to a 1d subspace."""
    affine_points = np.array([p.affine_point for p in points])
    n = (affine_points[1] - affine_points[0]) / np.linalg.norm(
        affine_points[1] - affine_points[0]
    )

    def signed_distance(pt):
        return np.dot(n, pt - affine_points[0])

    dists = list(map(signed_distance, affine_points))
    return intersection.join(points[np.argmin(dists)], points[np.argmax(dists)])


triangles_lines = [
    [
        join_outer_points(
            edges_intersections[i - 1][j],
            edges_intersections[i][j],
            triangles[i][j],
            triangles[i][(j + 1) % 3],
        )
        for j in range(3)
    ]
    for i in range(3)
]
Finally, we add a projection plane to catch the shadow.
# Projection plane
projection_plane = subspaces.hyperplane_from_normal(
    projection_plane_normal, projection_plane_level
)
projection_plane = projection_plane.orthonormalize()
Visualization
Again we start with a block of initial data for our visualization. This allows an easy change of parameters. Further we need a utility function to visualize a triangle, here a halfedge object is created and then visualized.
segment_sampling = 1
line_sampling = 1
point_radius = 0.1
segment_bevel = 0.03
line_bevel = 0.06
projection_plane_kwargs = {"bounding": 45, "sampling": 1}
colors = [
    blender.material.material("orange", (0.8, 0.1, 0.036), 0, 0),
    blender.material.material("blue", (0.019, 0.052, 0.445), 0, 0),
    blender.material.material("lightblue", (0.128, 0.59, 0.8), 0, 0),
]


def draw_triangle(triangle, name=None, material=None):
    hds = ddg.halfedge.surface_generator.disc(3)
    for v in hds.verts:
        v.co = triangle[v.index].affine_point
    bobj = ddg.to_blender_object_helper(hds, name=name, material=material)
    return bobj
Now we can visualize all our objects,
bobj_p_lines = [
    ddg.to_blender_object_helper(
        p_lines[i],
        sampling=line_sampling / 10,
        curve_properties={"bevel_depth": line_bevel},
        domain=[[-2, triangle_distances[2][i] + 2]],
        name=f"p_line_{i}",
        material=colors[0],
    )
    for i in range(3)
]
bobj_triangles = [
    draw_triangle(triangles[i], name=f"triangle_{i}", material=colors[0])
    for i in range(3)
]
bobj_segments = [
    [
        ddg.to_blender_object_helper(
            triangles_lines[i][j],
            sampling=segment_sampling,
            curve_properties={"bevel_depth": segment_bevel},
            domain=[[0, 1]],
            name=f"segment_{i}_{j}",
            material=colors[2],
        )
        for j in range(3)
    ]
    for i in range(3)
]

bobj_points = [
    [
        ddg.to_blender_object_helper(
            edges_intersections[i][j],
            sphere_radius=point_radius,
            name=f"meet_{i}_{j}",
            material=colors[2],
        )
        for j in range(3)
    ]
    for i in range(3)
]

bobj_lines = [
    ddg.to_blender_object_helper(
        lines[i],
        sampling=line_sampling,
        curve_properties={"bevel_depth": line_bevel},
        name=f"line_{i}",
        material=colors[1],
    )
    for i in range(3)
]

bobj_x = ddg.to_blender_object_helper(
    x, sphere_radius=point_radius, material=colors[1], name="x"
)
bobj_projection_plane = ddg.to_blender_object_helper(
    projection_plane, **projection_plane_kwargs
)
and add a light and a camera.
bobj_camera = blender.camera.camera()
bobj_light = blender.light.light(
    name="Light", type_="SPOT", location=center_of_projection, energy=500000
)
bobj_light.data.shadow_soft_size = 0
blender.light.look_at_point(
    bobj_light, ddg.math.projective.dehomogenize(projection_plane.points[0])
)

bobj_camera.location = (18.5, -17, 16.6)
bobj_camera.data.clip_end = 200
bobj_camera.rotation_euler = np.array([74.2, 0, 46]) / 180 * np.pi
bobj_light.data.spot_size = 0.404916
Finally these are the rendering setting used in this example.
# rendering settings
bpy.context.scene.render.resolution_x = 2000
bpy.context.scene.render.resolution_y = 2000
ddg.visualization.blender.render.setup_cycles_renderer()
ddg.visualization.blender.render.set_film_transparency()
ddg.visualization.blender.render.set_world_background(
    (0.184469, 0.184469, 0.184469, 1), 1.5
)
That’s it! You should be able to just put that in your blender code editor and simply execute it. Hit the render button to render the image at the top.